Easy Vampire Halloween Makeup Tutorial for Beginners (2026): A Step-by-Step Guide That Lasts All Night

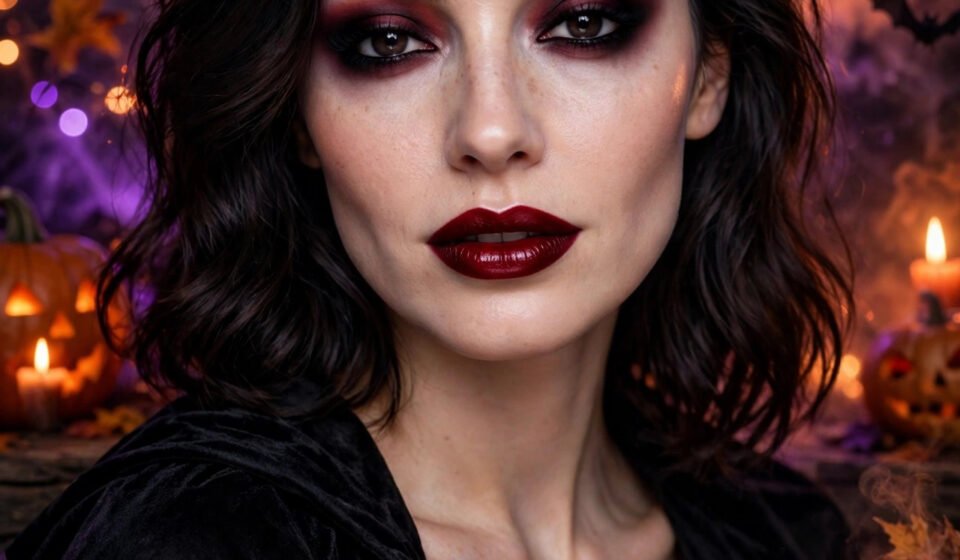
Easy vampire Halloween makeup is the perfect first Halloween look if you want something dramatic, elegant, and surprisingly simple. You do not need professional face paint, expensive prosthetics, or years of practice. With a pale base, deep eye makeup, sharp contour, and a rich red lip, you can create a classic vampire look in under an hour, using products you may already own. This easy vampire Halloween makeup tutorial for beginners walks you through every step, explains which product types to choose, and shows you how to make the look last all night without cracking, fading, or irritating your skin.
If you are new to Halloween makeup, start here at DailyMakeupTip for simple, wearable beauty ideas, and keep this guide open while you work. You will build the look slowly, in thin layers, so you can correct mistakes as you go. That is the real secret to beginner-friendly Halloween makeup: control beats speed every time.
What Makes Easy Vampire Halloween Makeup So Beginner-Friendly?
A vampire look works for beginners because it is built from familiar everyday techniques. The base is just foundation applied a little lighter than usual. The eyes are a soft smoky eye, not a precise graphic design. The cheeks use contour you may already use for evening makeup, only slightly deeper. The lips are a bold red, applied carefully and then blotted. Even if your lines are not perfect, the finished look still reads as intentional, moody, and polished, especially in dim party lighting.
Unlike a costume that depends on a detailed mask or a full-body outfit, easy vampire Halloween makeup lets your face do most of the work. A simple black outfit, a dark cape, or even an all-black dress or shirt instantly completes the character. That makes it ideal for a last-minute party, a work event, a school celebration, or a night out when you do not want to buy a whole costume.
What You Need for Easy Vampire Halloween Makeup
You do not need a special Halloween kit. These product types are enough, and most can be swapped for what you already have at home:
- Moisturizer and primer: A lightweight moisturizer for comfort and a gripping or mattifying primer to help makeup stay put.
- Light foundation or concealer: Choose a shade one to two shades lighter than your usual foundation, or use your normal foundation with a lighter concealer on the center of the face.
- Setting powder: A translucent powder to lock the base and prevent shine, especially on the forehead, nose, and chin.
- Contour powder or cream: A cool-toned contour shade for hollow cheeks, a sharper jawline, and a slightly narrower nose.
- Black, grey, and deep burgundy eyeshadow: A matte black, a soft grey, and a wine or plum shade for depth around the eyes.
- Black eyeliner: A pencil liner for smudging and a liquid or gel liner if you want a sharper wing.
- Mascara and optional false lashes: A volumizing mascara, plus strip lashes if you want extra drama without extra skill.
- Eyebrow product: A pencil or powder in your natural brow shade to define and slightly arch the brows.
- Deep red lipstick and lip liner: A long-wearing matte or satin lipstick in blood red, oxblood, or deep burgundy, with a matching liner.
- Optional extras: Fake blood for a small detail at the corner of the mouth, a beauty sponge, blending brushes, and a long-wearing setting spray.
Before you begin, do a quick patch test with any new product, especially face paint, fake blood, or false-lash glue. Apply a small amount behind your ear or on your inner arm, wait a few minutes, and check for redness or itching. Comfort matters more than drama, and a look you can wear happily for hours is always better than one you want to remove after thirty minutes.
Step 1: Prep Your Skin for a Long-Lasting Vampire Look
Start with clean, moisturized skin. Wash your face, apply a light moisturizer, and let it sink in for two or three minutes. If your skin is oily, use a mattifying primer on the T-zone. If your skin is dry, choose a hydrating primer and avoid heavy powder on dry patches. Good preparation is what separates easy vampire Halloween makeup that lasts from makeup that slides off by midnight.
For extra staying power, mist your face lightly with setting spray after primer, then again at the very end. Think of it as sandwiching your makeup between two thin layers of protection. This simple trick helps foundation, contour, and eyeshadow stay in place through dancing, photos, and warm party rooms.
Step 2: Create a Pale, Even Vampire Base
Apply your lighter foundation in thin layers with a damp sponge or a dense brush. Start in the center of the face and blend outward, including the jawline and a little down the neck so there is no harsh line. The goal is pale and even, not white or chalky. You want to look like a vampire, not like you are wearing a mask.
Next, use concealer under the eyes, on the bridge of the nose, and on the center of the chin. Blend it well, then set the whole base with translucent powder. Press the powder in gently rather than sweeping it across the face, which can move the foundation underneath. If you want a slightly more supernatural finish, add a very light dusting of powder to the neck and chest as well, so your skin tone looks consistent in photos.
For a polished glow that still fits the vampire theme, you can add a cool-toned highlight to the cheekbones and brow bone. If you want to learn the technique properly, read How to Apply Highlighter Like a Pro (Glow in 5 Minutes). Use a light hand here: a soft, icy highlight suits a vampire perfectly, while a warm golden glow can soften the effect too much.
Step 3: Sculpt Hollow Cheeks and a Sharp Jawline
Contour is what gives this look its vampire structure. Suck your cheeks in gently to find the hollows, then apply contour powder just below the cheekbones, blending upward and outward. Keep the color cool-toned rather than orange, because cool shadows look more natural and more dramatic at the same time.
Add a small amount of contour along the jawline and on the sides of the nose, blending carefully so there are no visible lines. Then blend everything again with a clean fluffy brush. Step back from the mirror and check the look in normal light, not just bathroom light. Contour that looks strong up close often looks perfect from a normal distance, which is how other people will see you.
Step 4: Build a Smoky, Mysterious Vampire Eye
Start with an eyeshadow primer or a thin layer of concealer on the lids, set with powder. Apply a medium grey or taupe shade through the crease as your transition color. Then press a deep burgundy or plum shade onto the outer corner and blend it into the crease. This adds warmth and depth without making the eye look messy.
Next, apply black eyeshadow close to the lash line and blend it upward, keeping the darkest color nearest the lashes. Smudge black pencil liner along the upper and lower lash lines, then soften the edges with a small brush. A slightly imperfect, smoky edge is actually perfect for a vampire: it looks sultry and lived-in rather than harsh.
Finish with two coats of volumizing mascara. If you use false lashes, choose a natural-to-dramatic strip lash, trim it to fit your eye, and let the glue become tacky for about thirty seconds before applying. Place the strip as close to your natural lashes as possible, then add mascara to blend them together. Avoid heavy glitter on the eyes for a classic vampire; save sparkle for a glam version of the look.
Step 5: Shape Bold, Arched Vampire Brows
Brush your brows upward and fill any sparse areas with short, hair-like strokes. Aim for a slightly stronger arch than usual, because arched brows instantly make the face look more intense and elegant. Keep the inner brow softer and the tail a little more defined. Set the brows with clear brow gel so they stay in place all night.
If you normally keep your brows very natural, do not overdraw them for Halloween. A modest increase in definition is enough. The eyeshadow and lips already carry the drama, so the brows should frame the face, not compete with it.
Step 6: Apply a Deep Blood-Red Lip
Exfoliate and moisturize your lips first, then blot away excess balm. Line your lips with a matching deep red liner, slightly defining the cupid’s bow for a sharper shape. Fill in the lips with lipstick, blot with tissue, add a second thin layer, and blot again. This layering method helps a bold lip last through talking, drinking, and photos.
For a classic vampire lip, keep the edges clean and the center rich and opaque. For a more bitten, modern effect, press a tiny amount of deep red shadow or lipstick into the center of the lower lip and blend outward very lightly. Clean up the edges with a small brush and concealer if needed. Avoid applying fake blood directly over fresh lipstick unless the product is made for use around the mouth, and keep it to a small detail at one corner rather than a large smear.
Step 7: Add Optional Vampire Details, Then Set Everything
Optional details can elevate easy vampire Halloween makeup without making it complicated. A pair of simple costume fangs, worn only if they feel comfortable and safe, can transform the look instantly. A small amount of fake blood at the corner of the mouth can add storytelling, but less is more. A dark red or black nail polish, a sleek hairstyle, and simple dark jewelry complete the character without extra makeup skill.
Finally, mist your whole face with setting spray, holding the bottle about eight inches away. Let it dry without touching your face. Carry blotting paper and your lipstick for touch-ups, rather than adding more powder all night. Blotting removes shine without building up a heavy, cakey layer.
Beginner Tips That Make the Biggest Difference
- Work in thin layers: Thick foundation and eyeshadow crease faster and are harder to blend. Build color gradually.
- Blend, then blend again: Most beginner mistakes are visible edges, not wrong colors. A clean blending brush fixes almost everything.
- Do eyes before the base if you are nervous: If eyeshadow falls onto your cheeks, you can clean it up before foundation. Just remember to set the base afterward.
- Use tape as a guide: A small piece of tape at the outer eye corner can help you create a clean smoky wing. Remove it gently before finishing the rest of the face.
- Take a photo in different light: Phone photos reveal uneven blending and harsh lines that a mirror can hide.
- Keep tools clean: Dirty brushes cause muddy color and patchy blending. Use a clean brush for each major step when you can.
Easy Vampire Halloween Makeup for Different Skin Types
For oily skin, choose a matte primer, a long-wearing foundation, and a generous but pressed layer of setting powder. Keep blotting paper in your bag. For dry skin, use a hydrating primer, a satin or natural-finish foundation, and powder only where you truly need it. Cream contour and cream products blend more comfortably on dry skin than heavy powders.
For sensitive skin, simplify the product list. Skip fake blood, heavy fragrance, and new face paints. Use products you already tolerate, and remove makeup gently at the end of the night. For deeper skin tones, a pale vampire base should be used lightly and blended carefully into the neck; a cooler contour, a rich burgundy eye, and a deep oxblood lip can create a stunning vampire effect without making the skin look grey or ashy.
How to Remove Vampire Makeup Without Damaging Your Skin
Removal is part of the tutorial, especially for beginners. Start with a cleansing balm or micellar water to dissolve long-wearing lipstick, eyeliner, and mascara. Follow with a gentle cleanser and lukewarm water. Avoid scrubbing waterproof eye makeup, which can irritate the delicate skin around the eyes. Use a dedicated eye makeup remover on a cotton pad, hold it over closed lashes for a few seconds, then wipe gently downward.
After cleansing, apply moisturizer and, if your skin feels tight, a soothing serum or light facial oil. Wash brushes and sponges the next day so old pigment does not stain future looks. If any fake blood or adhesive remains, remove it with warm water and a gentle cleanser rather than pulling at the skin.
Common Beginner Mistakes to Avoid
The most common mistake is making the base too white. A vampire should look pale, not painted. Another mistake is using too much black eyeshadow at once. Start with less, blend, and add more only where you need depth. A third mistake is skipping setting spray or powder, which leads to smudged liner and faded lips by the middle of the party. Finally, do not try every idea at once. Choose one version: classic, glam, or modern. A focused look always photographs better than a crowded one.
Variations to Try Once You Master the Classic Look
Once you feel confident, you can adapt this easy vampire Halloween makeup in small ways. A glam vampire adds a touch of shimmer on the inner eye corner and a glossy deep red lip. A modern vampire keeps the base more natural and lets the smoky eye and lip do the work. A vintage vampire uses softer grey eyeshadow, a neat red lip, and sleek, center-parted hair. Each version uses the same basic steps, so you are not learning a new routine from scratch.
Final Thoughts
Easy vampire Halloween makeup proves that a memorable Halloween look does not have to be difficult. With careful skin prep, a pale and even base, sculpted cheeks, a soft smoky eye, and a bold red lip, beginners can create a look that feels confident, elegant, and camera-ready. Practice once before the big night, keep your layers thin, and set everything well. Then enjoy the party, knowing your vampire look will still look sharp hours later. For more everyday glow techniques you can use long after Halloween, visit DailyMakeupTip and explore the highlighter guide at How to Apply Highlighter Like a Pro (Glow in 5 Minutes).